Building and Deploying a MinIO-Powered LangChain Agent API with LangServe

Our journey through the innovative world of LangChain has unveiled its substantial capabilities in transforming data management and application functionality.
Through previous discussions, we delved into several topics while exploring the intricate capabilities of LangChain. In this article, we will build upon the concepts covered in "Empowering Langchain Agents with MinIO" as we expand the functionality of a MinIO agent to encapsulate additional abilities and deploy the custom agent via LangServe.
- Innovating S3 Bucket Retrieval with LangChain: A walkthrough on leveraging LangChain’s S3 Loaders and the OpenAI API to craft custom conversational AI agents, establishing a streamlined approach for data management.
- Empowering LangChain Agents with MinIO: A deep dive into harnessing MinIO’s, showcasing how LangChain, coupled with OpenAI’s GPT, pioneers new frontiers in AI and ML data processing.
Building on these insights, we now turn our focus to LangServe, a pivotal tool in transitioning LangChain applications from development to deployment, simplifying the process of launching production-ready APIs.
LangServe: Simplifying Deployment for LangChain Applications
LangServe stands as a cornerstone for developers, eliminating the complexities traditionally associated with API deployment. It enables a smooth transition of MinIO-integrated LangChain applications into accessible, user-friendly APIs. Here’s how LangServe redefines the deployment landscape:
- Automatic API Endpoint Creation: LangServe’s automation capabilities effortlessly generate the necessary API endpoints, streamlining development efforts and significantly reducing time to deployment.
- Schema Generation and Validation: With its intelligent schema inference, LangServe ensures that APIs offer well-defined interfaces, facilitating easier integration and a seamless user experience.
- Customizable Endpoint Configuration: LangServe offers a variety of endpoints to suit diverse application needs, from synchronous operations to real-time updates, providing developers with unparalleled flexibility.
- Effortless Integration: Perhaps its most compelling feature, LangServe’s ability to seamlessly integrate with existing LangChain code means developers can leverage their current codebase and expertise without significant alterations.
Diving Deep into LangChain and Langserve
We will dive deeper into the process of integrating MinIO with LangChain in the following steps.
- Create a LangChain App with
langchain-cli. - Develop a custom LangChain agent in an
agent.pyfile. - Implement our agent in
server.pyto run as a LangServe API.
Using LangChain’s Command-line Interface to Create Apps
Deploying LangChain applications with LangServe brings a seamless integration journey, bridging the gap between complex AI functionalities and RESTful API exposure, empowering developers to leverage the full spectrum of LangChain capabilities efficiently, setting a new standard for deploying intelligent applications in today’s fast-paced digital landscape.
LangChain offers a convenient and simple method of creating applications using their langchain-cli library which can be installed with pip. This package provides an interface that allows users to easily create new applications by utilizing existing LangChain app templates or creating your own.
Note: All necessary files are located in the MinIO “blog-assets” repository under the directory named “minio-langserve-deployment”.
To create a new LangChain application we can start with the following commands to create a virtual environment and install the langchain-cli package:
mkdir minio-langserve-testing
cd minio-Langserve-testing


python -m venv .myenv
source .myenv/bin/activate


pip install langchain-cli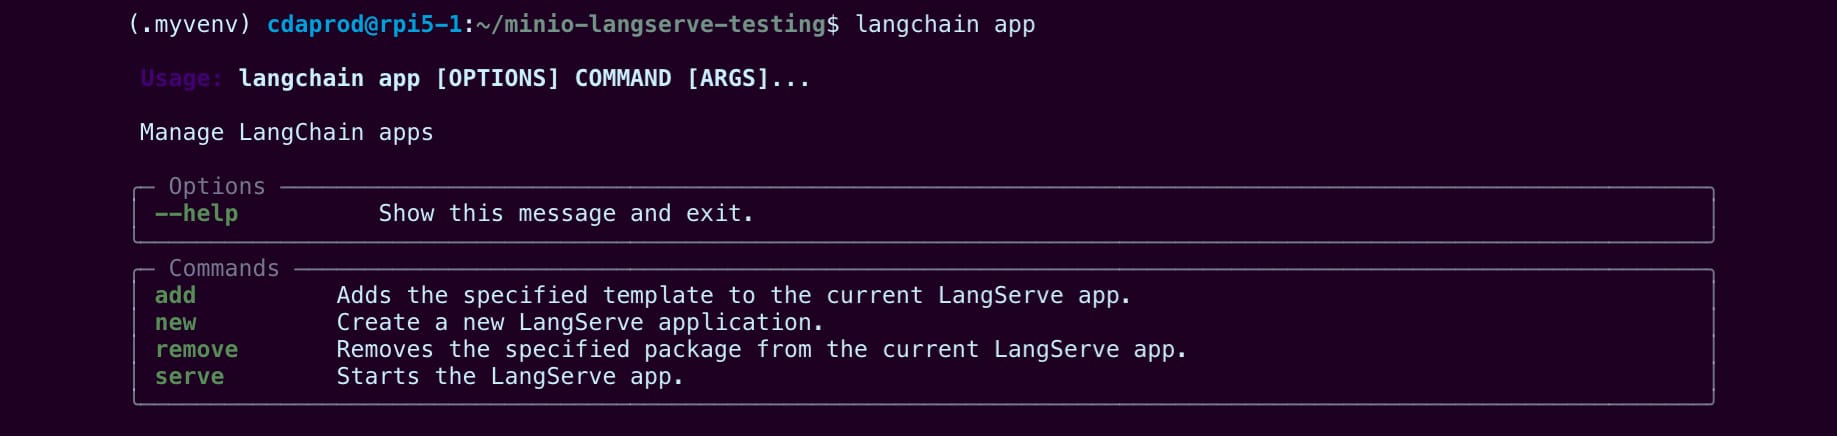
In order to create a new app using langchain-cli we can type langchain in our terminal, the following command is written to create a new application directory named my-app.
langchain app new my-appThe langchain app created with the above commands, does all the heavy lifting by creating a consistent environment for development. The structure of a new LangChain application straight out of the box looks like this:
./my-app
├── Dockerfile
├── README.md
├── app
│   ├── __init__.py
│   └── server.py ⇐ (This is where we will import our agent into)
├── packages ⇐  (This directory is where we will write our agent)
│   └── README.md
└── pyproject.toml
In the following steps we will be making changes to the newly created LangChain application (my-app) by writing a new file named packages/agent.py and making changes to app/server.py.
These are the files we will be discussing in this article:
my-app/packages/agent.pymy-app/app/server.py
Developing a LangChain MinIO Agent to Deploy with LangServe
To illustrate the deployment of a MinIO-integrated LangChain agent with LangServe, we'll start by saving the agent chain code in agent.py.
First, let's initialize a minio_client that connects to the "play.min.io:443" public server. This file will eventually call LangChain's agent_executor, allowing us to pass it to LangServe's add_route wrapper.
Note: Reading the previous publication "MinIO Langchain Tool" will provide valuable insights into developing with LangChain and MinIO together. We'll follow a similar conceptual approach but with additional MinIO tool logic.
To get started, open the agent.py file using a text editor:
sudo nano packages/agent.pyAt the beginning of the file, import the necessary packages, such as os, io, minio and ChatOpenAI:
import os
import io
from minio import Minio
from minio.error import S3Error
from langchain_openai import ChatOpenAI


os.environ["OPENAI_API_KEY"] = "<<Your API Key Here>>"

# Initialize llm
llm = ChatOpenAI(api_key=os.environ["OPENAI_API_KEY"])

# Initialize MinIO client
minio_client = Minio('play.min.io:443',
                     access_key='minioadmin',
                     secret_key='minioadmin',
                     secure=True)
In this code snippet, we import the required packages and initialize the ChatOpenAI language model with the OpenAI API key stored in the OPENAI_API_KEY environment variable. We also initialize the minio_client by providing the necessary connection details to the "play.min.io" public server.
Next, let's define the MinIO bucket and create it if it doesn't exist:
# This variable will check if bucket exists
bucket_name = "test"


try:
    # Check if bucket exists
    if not minio_client.bucket_exists(bucket_name):
        # Create the bucket because it does not exist
        minio_client.make_bucket(bucket_name)
        print(f"Bucket '{bucket_name}' created successfully.")
    else:
        print(f"Bucket '{bucket_name}' already exists.")
except S3Error as err:
    print(f"Error encountered: {err}")
Here, we define the bucket_name as "test" and check if it already exists using the minio_client.bucket_exists() method. If the bucket doesn't exist, we create it using minio_client.make_bucket(). If the bucket already exists, we print a message indicating so. We also include error handling using a try-except block to catch and print any S3Error that may occur during the process.
With the basic setup in place, we can now proceed to define the MinIO tool functions and create the agent executor, which we'll cover in the next steps.
Using LangChain’s Function Decorator for Agent Tools
Langchain and Langserve both provide a similar approach to encapsulating logic and functionality, allowing it to be seamlessly integrated into agent and chain logic. This is achieved through the use of the @tool decorator with a detailed docstring inside the defined function, which marks functions as reusable components that can be utilized and interpreted by the AI agent.
Let's take a closer look at the provided code examples:
from langchain.agents import tool

@tool
def upload_file_to_minio(bucket_name: str, object_name: str, data_bytes: bytes):
    """
    Uploads a file to MinIO.

    Parameters:
        bucket_name (str): The name of the bucket.
        object_name (str): The name of the object to create in the bucket.
        data_bytes (bytes): The raw bytes of the file to upload.
    """
    data_stream = io.BytesIO(data_bytes)
    minio_client.put_object(bucket_name, object_name, data_stream, length=len(data_bytes))
    return f"File {object_name} uploaded successfully to bucket {bucket_name}."
The upload_file_to_minio function is decorated with @tool, indicating that it is a reusable component. It takes in the necessary parameters to upload a file to a MinIO bucket, such as the bucket name, object name, and the raw bytes of the file. The function utilizes the minio_client to perform the file upload operation and returns a success message upon completion.
@tool
def download_file_from_minio(file_info):
    """
    Custom function to download a file from MinIO.

    Expects file_info dict with 'bucket_name', 'object_name', and 'save_path' keys.
    'save_path' should be the local path where the file will be saved.
    """
    bucket_name = file_info['bucket_name']
    object_name = file_info['object_name']
    save_path = file_info['save_path']
    minio_client.get_object(bucket_name, object_name, save_path)
Similarly, the download_file_from_minio function is also marked with @tool. It expects a file_info dictionary containing the necessary information to download a file from a MinIO bucket, such as the bucket name, object name, and the local path where the file should be saved. The function uses the minio_client to retrieve the object from the specified bucket and save it to the designated local path.
@tool
def list_objects_in_minio_bucket(file_info):
    """
    Custom function to list objects in a MinIO bucket.

    Expects file_info dict with 'bucket_name' key.
    Returns a list of dictionaries containing 'ObjectKey' and 'Size' keys.
    """
    bucket_name = file_info['bucket_name']
    response = minio_client.list_objects(bucket_name)
    return [{'ObjectKey': obj.object_name, 'Size': obj.size} for obj in response.items]
The list_objects_in_minio_bucket function, also decorated with @tool is responsible for listing the objects present in a MinIO bucket. It expects a file_info dictionary with the bucket_name key. The function uses the minio_client to retrieve the list of objects in the specified bucket and returns a list of dictionaries containing the object key and size for each object.
By encapsulating these functionalities as tools, Langchain and Langserve enable the AI agent to seamlessly incorporate them into its logic and decision-making process. The agent can intelligently select and execute the appropriate tool based on the task at hand, enhancing its capabilities and allowing for more complex and dynamic interactions with the MinIO storage system.
Understanding LangChain’s Runnable Method
LangChain offers a myriad of methods for building with custom logic, one such approach is that of “runnables”. As for the above demonstrative logic, RunnableLambda which is a construct provided by LangChain that allows functions to be treated as executable units within the AI agent's logic.
from langchain_core.runnables import RunnableLambda


upload_file_runnable = RunnableLambda(upload_file_to_minio)
download_file_runnable = RunnableLambda(download_file_from_minio)
list_objects_runnable = RunnableLambda(list_objects_in_minio_bucket)
By wrapping the tool functions with RunnableLambda, we create runnable instances (upload_file_runnable, download_file_runnable, and list_objects_runnable) that can be invoked by the agent during its execution. These runnables encapsulate the corresponding tool functions and provide a uniform interface for the agent to interact with them.
tools = [upload_file_to_minio, download_file_from_minio, list_objects_in_minio_bucket]


llm_with_tools = llm.bind_tools(tools)
The tools list contains the original tool functions (upload_file_to_minio, download_file_from_minio, and list_objects_in_minio_bucket), which serve as the building blocks for the agent's capabilities. The llm.bind_tools(tools) line binds the tools to the language model (llm), establishing a connection between the model's reasoning capabilities and the specific functionalities provided by the tools. The resulting llm_with_tools represents the language model enhanced with the knowledge and ability to employ the bound tools.
The use of RunnableLambda and the binding of tools to the language model demonstrate the flexibility and extensibility of LangChain and LangServe in creating powerful and customizable AI agents. By combining the power of the language model with the specific functionalities encapsulated in the tools, the AI agent gains the ability to perform complex tasks, such as uploading files to MinIO, downloading files from MinIO, and listing objects in a MinIO bucket.
Writing a Prompt Template to Guide our Agent
Next we shift our focus to the prompt template that guides the AI agent in understanding and responding to user inputs. It is defined using the ChatPromptTemplate.from_messages() method, which takes a list of messages represented as tuples containing the role and message content.
from langchain_core.prompts import ChatPromptTemplate, MessagesPlaceholder
from langchain.agents.format_scratchpad.openai_tools import format_to_openai_tool_messages
from langchain.agents.output_parsers.openai_tools import OpenAIToolsAgentOutputParser
from langchain_core.messages import AIMessage, HumanMessage


prompt_template = ChatPromptTemplate.from_messages([
    ("system", "You are a powerful assistant equipped with file management capabilities."),
    ("user", "{input}"),
    MessagesPlaceholder(variable_name="agent_scratchpad"),
])
The prompt consists of three messages:
- A "system" message setting the context for the AI agent as a powerful assistant with file management capabilities.
- A "user" message representing the user's input, using the
{input}placeholder. - A
MessagesPlaceholdernamed "agent_scratchpad" to store the agent's intermediate steps and thought process.
The format_to_openai_tool_messages function formats the agent's scratchpad into a compatible format for OpenAI's tools, while the OpenAIToolsAgentOutputParser class parses the model's response into a structured format interpretable by the agent.
The AIMessage and HumanMessage classes represent the messages exchanged between the agent and the user, providing a standardized way to handle communication within the agent's logic.
By defining the prompt template, we provide the AI agent with a clear structure and context for understanding and responding to user inputs, utilizing the "agent_scratchpad" placeholder to keep track of its intermediate steps and thought process while solving the task.
Defining the Agent with its Tools
Finally, to complete our agent.py we define our agent and create an AgentExecutor that can be imported and called from a server.py script using the add_route function from the LangServe library.
We instantiate the necessary components and chain them together to create a single agent variable.
agent = (
    {
        "input": lambda x: x["input"],
        "agent_scratchpad": lambda x: format_to_openai_tool_messages(x["intermediate_steps"]),
    }
    | prompt_template
    | llm_with_tools
    | OpenAIToolsAgentOutputParser()
)
The agent is defined using a combination of dictionaries and chained operations. The input key extracts the user input from the incoming data, while the agent_scratchpad key formats the intermediate steps of the agent's thought process using the format_to_openai_tool_messages function. The agent also incorporates the prompt template (prompt_template), the language model with tools (llm_with_tools), and the output parser (OpenAIToolsAgentOutputParser()).
Defining an AgentExecutor to Execute the Agent
To create an AgentExecutor, we provide it with the defined agent, available tools, and set verbose=True for detailed output.
from langchain.agents import tool, AgentExecutor


agent_executor = AgentExecutor(agent=agent, tools=tools, verbose=True)
The AgentExecutor uses the provided agent and tools to understand the task and select the appropriate tool based on the user's input. Instead of having separate prompts for each tool, the agent utilizes a single prompt template that guides it on how to use the tools based on the given input. The agent dynamically selects the appropriate tool during the execution process.
Defining the LangServe Route with our AgentExecutor
Setting up our application integrating it with LangServe provides a streamlined path to deploying and managing our LangChain applications as APIs. FastAPI is chosen for its performance and ease of use, supporting asynchronous operations and automatically generating API documentation.
The LangServe library, built with FastAPI, enriches this by simplifying the deployment of LangChain objects as REST APIs, offering built-in middleware for CORS settings to ensure our API can be safely called from different domains.
For more in-depth/use-case demonstrations, can be explored by visiting the langchain-ai/langserve GitHub repository under the examples directory.
from fastapi import FastAPI


app = FastAPI(
    title="MinIO Agent API",
    version="1.0",
    description="A conversational agent facilitating data storage and retrieval with MinIO",
)
For setting CORS headers we can add the following lines to enhance our security:
from fastapi.middleware.cors import CORSMiddleware


# Set all CORS enabled origins
app.add_middleware(
    CORSMiddleware,
    allow_origins=["*"],
    allow_credentials=True,
    allow_methods=["*"],
    allow_headers=["*"],
    expose_headers=["*"],
)
Implementing the Agent using LangServe
Now that we have finished with the packages/agent.py we can import it and use the add_route function from the LangServe library in our app/server.py script.
from packages.agent import agent_executor
from langserve import add_routes


add_routes(
   app,
   agent_executor.with_types(input_type=Input, output_type=Output).with_config(
       {"run_name": "agent"}
   ), path=”/invoke”
)
By calling add_route(app, agent_executor(…), path="/invoke"), we add a route to our server application (app) that maps the /invoke path to the agent_executor() function. This allows the agent executor to be invoked when a request is made to the /invoke endpoint.
With this setup, the server can handle incoming requests, pass them to the agent executor, and return the agent's response back to the client. The agent executor utilizes the defined agent, which incorporates the prompt template, language model with tools, and output parser, to process the user input and generate an appropriate response based on the available tools.
Launching the LangServe Application via Uvicorn
To kickstart the LangServe application, we employ Uvicorn as the ASGI server, setting the stage for our app to run. This snippet of code is pivotal as it activates the server, specifying the universal host and the designated port for the application’s access points.
if __name__ == "__main__":
    import uvicorn
    uvicorn.run(app, host="0.0.0.0", port=8000)
By embedding this block within the application’s main entry, we ensure that Uvicorn takes the helm when the script is executed directly, thereby lighting up our FastAPI application on a predefined host and port. This approach not only simplifies the deployment process but also marks a clear entry for running the application in a development or production environment.
Starting the Server Application
The above code has been demonstrated a modular approach which includes using the “langchain-cli” library, creating a new langchain app, and saving the chain logic to agent.py while the FastAPI and LangServe implementation is saved to server.py.
This being our final step, we will save our application code to server.py for the demonstrative purpose of building our application.
The simplest way to run our service is with:
python server.pyThis command will run the application, while returning any logs or error messages that need to still be debugged.
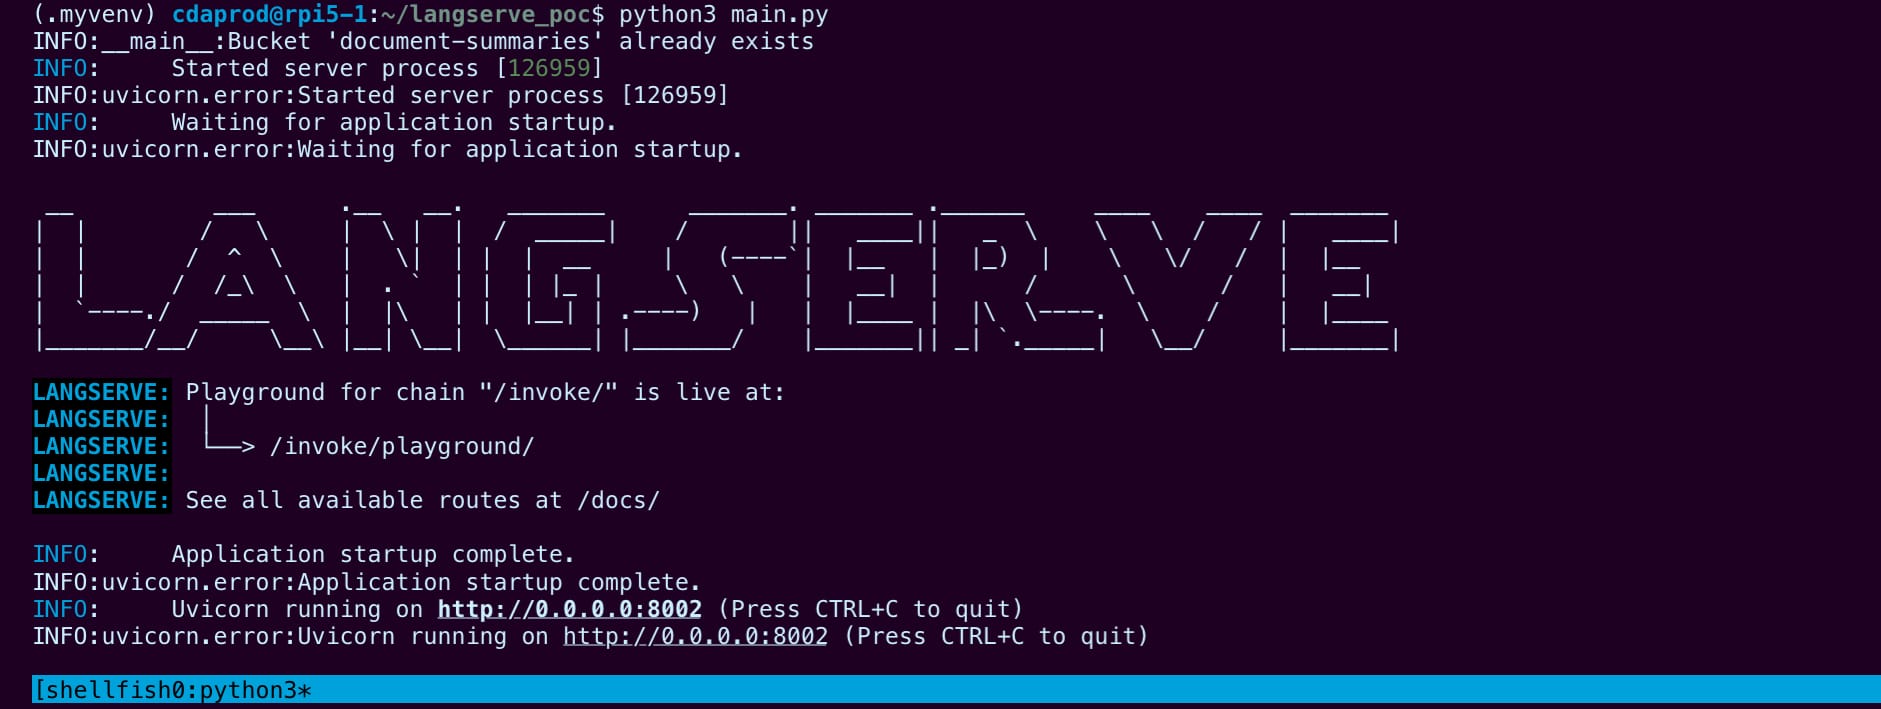
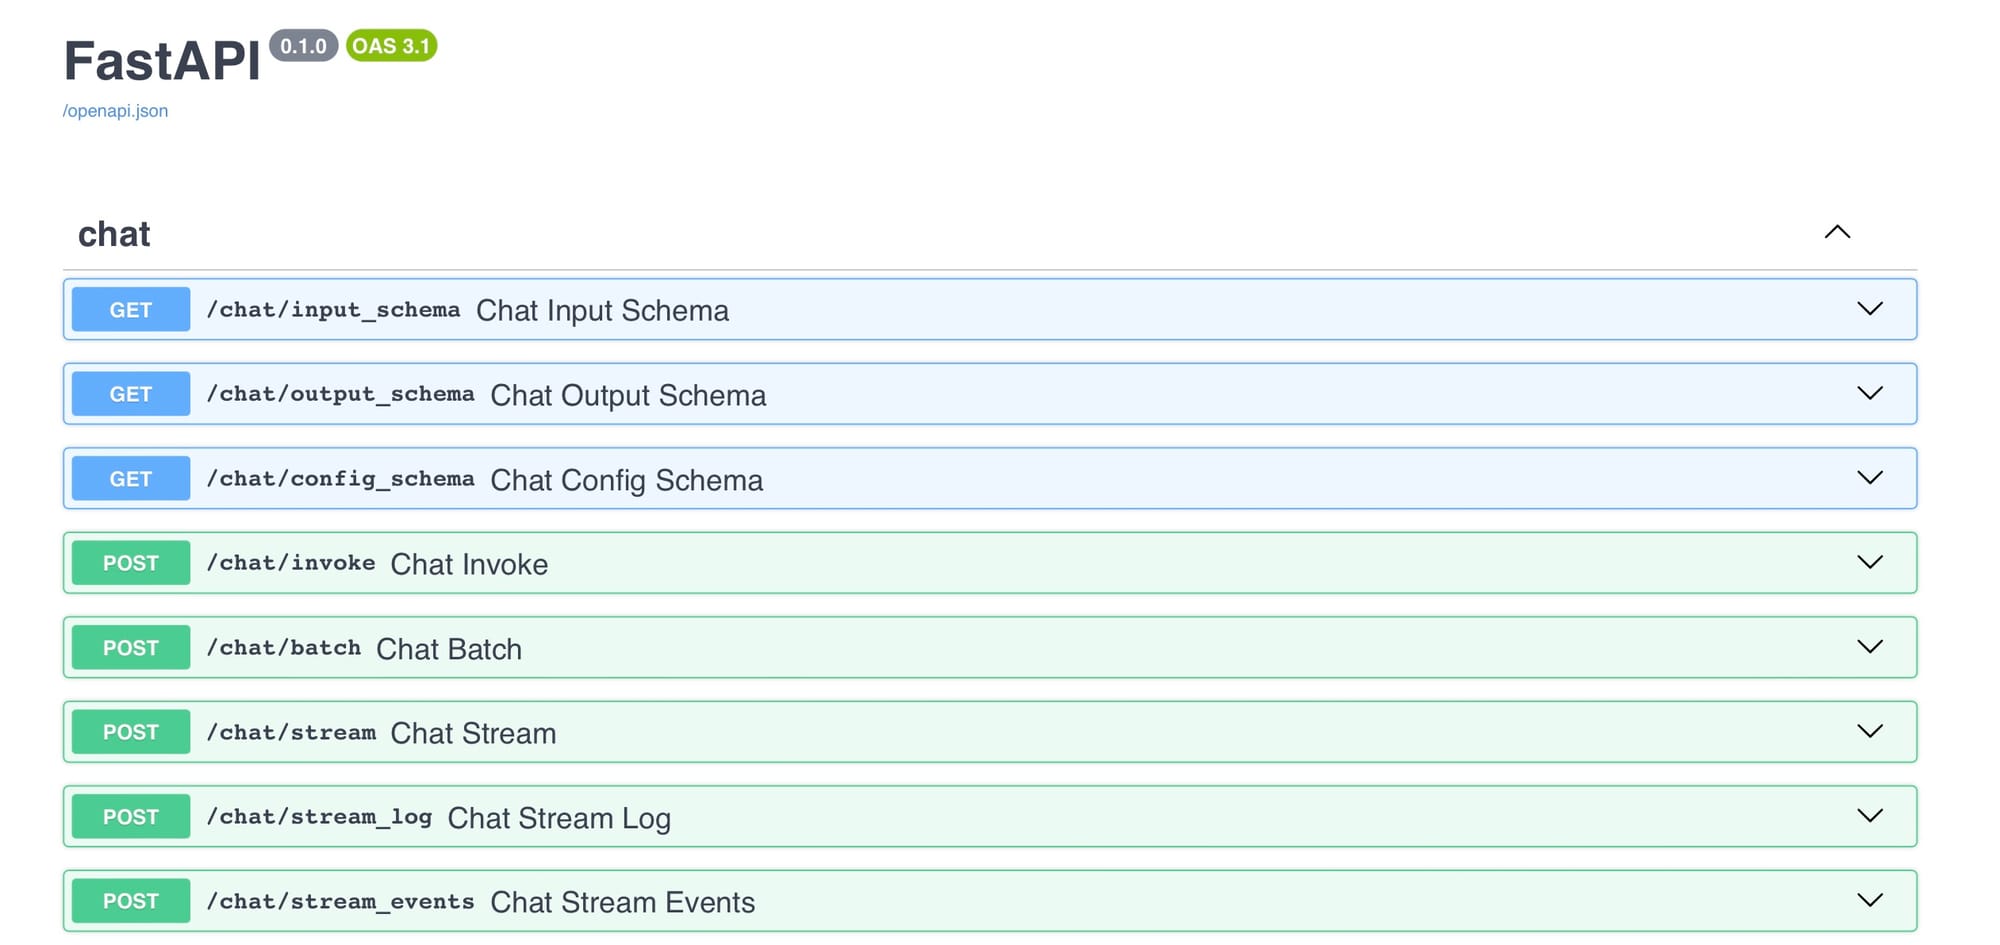
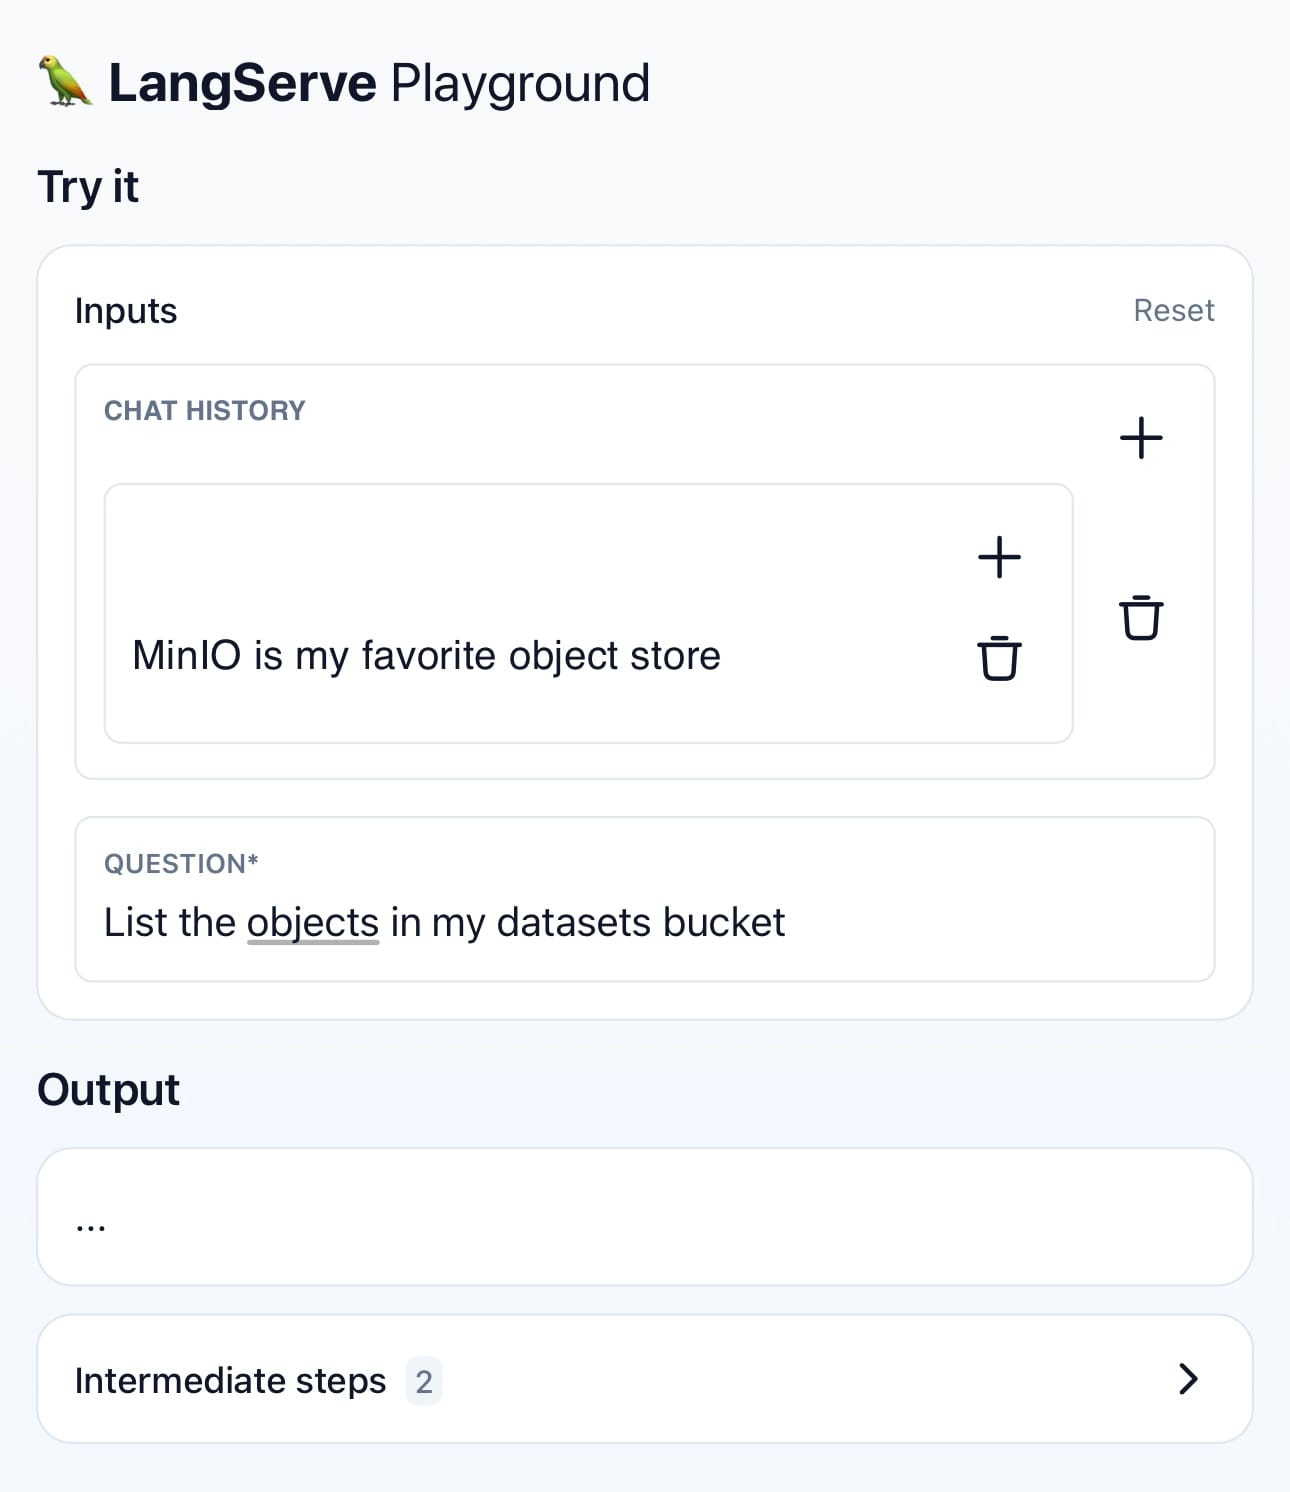
LangServe Playground
In the python output the LangServe logs identify /invoke/playground as the application endpoint. We can now visit the playground WebUI as well as the automated documentation for our API that’s available by visiting the /docs path of our API; giving us a simplified approach to testing and configuring by including Try it out button for each of our applications features, as well as predefined cURL requests that we can execute from the WebUI.
Consequently, our MinIO-integrated LangChain agent is now adeptly transformed into a deployable API, ready to be developed and extended for users with functionalities ranging from batch processing to real-time interactions.
Further Use of the LangServe API
With the LangServe application up and running we can use it from outside of our server.py, by targeting our endpoint and wrapping it in Langserve’s RemoteRunnable module:
from langserve import RemoteRunnable


remote_runnable = RemoteRunnable("http://localhost:8000/<path>/")
Add
LangChain boasts a vast array of modules across its libraries, showcasing a diverse toolkit designed to empower developers in building sophisticated AI-driven applications. From intricate chain constructions to seamless integration with various AI models, LangChain’s modular architecture facilitates a wide range of functionalities, enabling the creation of highly customizable and advanced solutions in the realm of AI and machine learning.
Developing AI Pipelines with LangServe
LangServe not only demystifies but significantly simplifies the process of deploying LangChain applications. By bridging the gap between development and deployment, it ensures that innovative applications leveraging MinIO and LangChain can swiftly move from concept to reality, ready to be integrated into the broader ecosystem and enhance user experiences.
Through the development covered in our explorations, we’ve seen the seamless integration of MinIO with LangChain is absolutely possible, and how LangServe plays a pivotal role in deploying these advanced solutions. As we continue to navigate the evolving landscape of AI and ML, tools like LangServe will remain instrumental in bringing cutting-edge technologies to the forefront of application development.
At MinIO, we’re energized by the creativity and potential within the developer community during this tech-rich era. There’s no better time for collaboration and knowledge exchange. We’re eager to connect with you! Join us on our MinIO Slack channel to continue the conversation and reach new heights together.